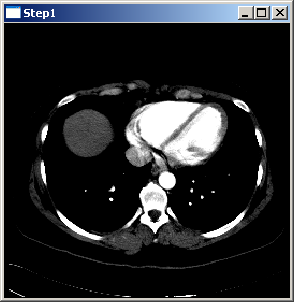
The first program shows how to display an image in a 2D view. The picture above is a snapshot of the program.
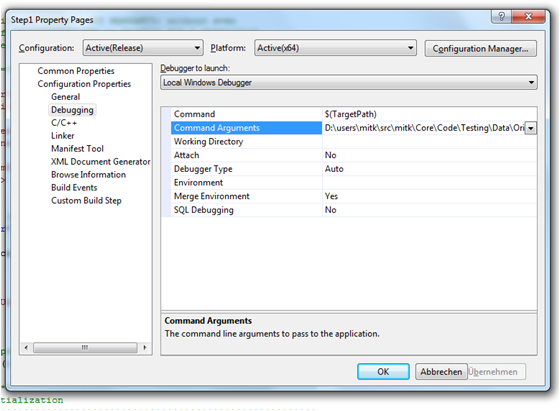
The program has to be executed using the image file mitk/Core/Code/Testing/Data/Pic3D.pic.gz. To set the image file path in Visual Studio, right click on "Step1"-project and go to 'Properties -> Configuration Properties -> Debugging'. Now insert the image file path in the "Command Arguments" text field. Use this also in the following steps.
The code is subdivided in parts I - V. First of all a DataTree has to be created. Then data has to be read from a file which afterwards has to be put into the tree. Part IV creates a window and passes the tree to it. The last part deals with some Qt-specific initialization.
/*=========================================================================

Program:   Medical Imaging & Interaction Toolkit
Language:  C++
Date:      $Date$
Version:   $Revision$

Copyright (c) German Cancer Research Center, Division of Medical and
Biological Informatics. All rights reserved.
See MITKCopyright.txt or https://www.mitk.org/copyright.html for details.

This software is distributed WITHOUT ANY WARRANTY; without even
the implied warranty of MERCHANTABILITY or FITNESS FOR A PARTICULAR
PURPOSE.  See the above copyright notices for more information.

=========================================================================*/

#include "QmitkRegisterClasses.h"
#include "QmitkRenderWindow.h"

#include <mitkPicFileReader.h>
#include <mitkStandaloneDataStorage.h>

#include <itksys/SystemTools.hxx>
#include <QApplication>

//##Documentation
//## @brief Load image (pic format) and display it in a 2D view
int main(int argc, char* argv[])
{
  QApplication qtapplication( argc, argv );

  if (argc < 2)
  {
    fprintf( stderr, "Usage:   %s [filename] \n\n", itksys::SystemTools::GetFilenameName(argv[0]).c_str() );
    return 1;
  }

  // Register Qmitk-dependent global instances
  QmitkRegisterClasses();

  //*************************************************************************
  // Part I: Basic initialization
  //*************************************************************************

  // Create a DataStorage
  // The DataStorage manages all data objects. It is used by the
  // rendering mechanism to render all data objects
  // We use the standard implementation mitk::StandaloneDataStorage.
  mitk::StandaloneDataStorage::Pointer ds = mitk::StandaloneDataStorage::New();


  //*************************************************************************
  // Part II: Create some data by reading a file
  //*************************************************************************

  // Create a PicFileReader to read a .pic-file
  mitk::PicFileReader::Pointer reader = mitk::PicFileReader::New();
  const char * filename = argv[1];
  try
  {
    reader->SetFileName(filename);
    reader->Update();
  }
  catch(...)
  {
    fprintf( stderr, "Could not open file %s \n\n", filename );
    exit(2);
  }

  //*************************************************************************
  // Part III: Put the data into the datastorage
  //*************************************************************************

  // Create a node and add the Image (which is read from the file) to it
  mitk::DataNode::Pointer node = mitk::DataNode::New();
  node->SetData(reader->GetOutput());

  // Add the node to the DataStorage
  ds->Add(node);


  //*************************************************************************
  // Part IV: Create window and pass the datastorage to it
  //*************************************************************************

  // Create a RenderWindow
  QmitkRenderWindow renderWindow;

  // Tell the RenderWindow which (part of) the datastorage to render
  renderWindow.GetRenderer()->SetDataStorage(ds);

  // Initialize the RenderWindow
  mitk::TimeSlicedGeometry::Pointer geo = ds->ComputeBoundingGeometry3D(ds->GetAll());
  mitk::RenderingManager::GetInstance()->InitializeViews( geo );
  //mitk::RenderingManager::GetInstance()->InitializeViews();

  // Select a slice
  mitk::SliceNavigationController::Pointer sliceNaviController = renderWindow.GetSliceNavigationController();
  if (sliceNaviController)
    sliceNaviController->GetSlice()->SetPos( 0 );

  //*************************************************************************
  // Part V: Qt-specific initialization
  //*************************************************************************
  renderWindow.show();
  renderWindow.resize( 256, 256 );

  // for testing
  #include "QtTesting.h"
  if (strcmp(argv[argc-1], "-testing") != 0)
    return qtapplication.exec();
  else
    return QtTesting();

  // cleanup: Remove References to node and DataStorage. This will delete the two objects
  node = NULL;
  ds = NULL;
}
 1.7.2
1.7.2

