Available sections:
This plug-in for Eclipse allows you to create new statemachines and change existing statemachines in an graphical editor. You can open existing statemachines from a xml file or create a new statemachine in a new xml file.
This document will tell you how to install the plug-in for eclipse and how to use it.
First of all you have to install Eclipse (Eclipse Classic) and the plug-in Graphical Editing Framework (GEF). Furthermore we need the packages JDOM (jdom.jar) and Java3D (vecmath.jar).
Caution: There have been problems reported with GEF runtime versions > 3.3.2. A known working configuration is: Eclipse SDK: 3.3.1 J3D: 1.5.1 Jdom: 1.0 GEF runtime: 3.3.2 Java Runtime Environment: jre6
Now you have to unzip the file StateMachines.zip into your eclipse folder. The file is located in your SVN checkout mitk.
Start Eclipse and select "File" -> "Import...".
Fig.1: Import
In the popup window (Fig.1: Import) select the folder "Plug-in Development" and "Plug-ins and Fragments". Click "Next >".
Fig.2: Import Plug-ins and Fragments
On the page "Import Plug-ins and Fragments" ( Fig.2: Import Plug-ins and Fragments) just click "Next >".
Fig.3: Selection
On the page "Selection" ( Fig.3: Selection) select the "StateMachines (1.0.0)" Plug-in and click the "Add ->" button.
Fig.4: Selection 2
Click "Finish" ( Fig.4: Selection 2).
Now you have to make sure that the path to vecmath.jar and jdom.jar is set correctly.
Fig.5: Set build path
You can find the build path by selecting the project in the "Package Explorer" view. Then go to "Project" -> "Properties" -> "Java Build Path" in the tab "Libraries" (as you can see in Fig.5: Set build path).
Now you should be able to start a Run-time Workbench.
Fig.6: Start Run-time Workbench
Therefore you have to press the "Run" button and select "Eclipse Application". Click "OK" (Fig.6: Start Run-time Workbench).
A new Eclipse workbench opens where we can use the Statemachine-Editor.
In the Eclipse Run-time Workbench we have to create a new Java project first (Fig.7: Create a new Java project).
Fig.7: Create a new Java project
Then you can select one of the two buttons:
When you press the button "New Statemachine" the following window will pop up:
Fig.8: New Statemachine
Here, you have to "Browse..." for your Java-Project as your file container (Fig.8: New Statemachine).
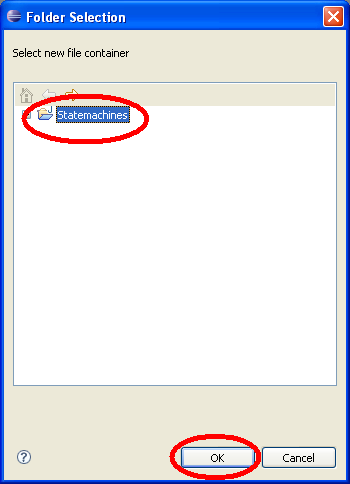
Fig.9: New Statemachine 1
Select your Project and click "OK" (Fig.9: New Statemachine 1).
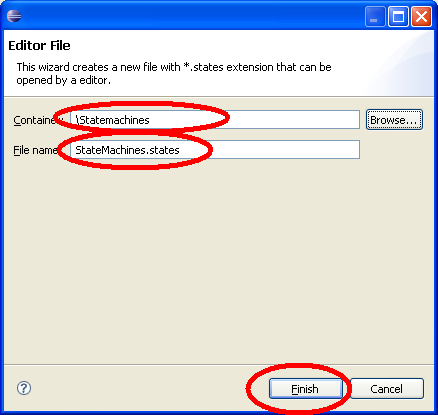
Fig.10: New Statemachine 2
As soon as you have selected a container and a File name, the "Finish" button will become enabled (Fig.10: New Statemachine 2).
Attention: If the filename has already been used, you have to set another filename to enable the "Finish" button.
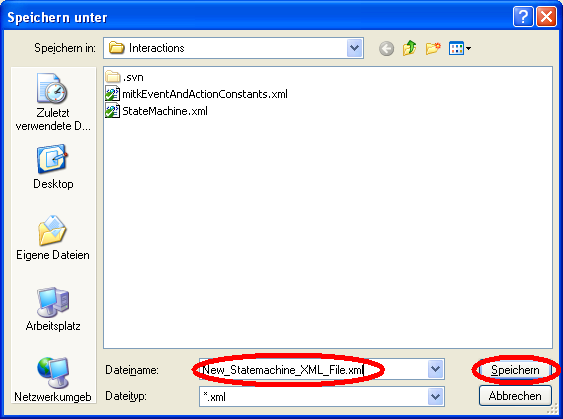
Fig.11: New Statemachine 3
As a last step you have to enter the location and name for the xml file to be generated (Fig.11: New Statemachine 3). If you want to have predefined events and actions, make sure the "mitkEventAndActionConstants.xml" file is in the same folder.
Read on in Section Work with the Editor.
When you press the button "Statemachines from *.xml" the following window will pop up:
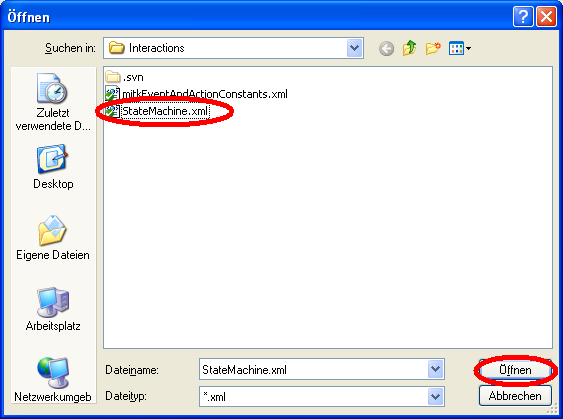
Fig.12: Open Statemachine from *.xml
Here you have to select the xml file, which contains the statemachines (Fig.12: Open Statemachine from *.xml). If you want to have predefined events and actions, make sure the "mitkEventAndActionConstants.xml" file is in the same folder.
Fig.13: Select container
Here, you have to "Browse..." for your Java-Project as your file container (Fig.13: Select container).
Fig.14: Select container 1
Select your Project and click "OK" (Fig.14: Select container 1).
Fig.15: Select container 2
As soon as you have selected a container, the "Finish" button will become enabled (Fig.15: Select container 2).
Read on in Section Work with the Editor.
Now your workspace looks something like this:
Fig.16: Workspace
You can open a statemachine from the "Statemachines List" view (Fig.16: Workspace) by performing a double click on the statemachine. An editor opens and on its palette you can find different tools, such as create state or create transition.
Fig.17: Open the properties view
Fig.18: Change statename in the properties view
To edit the statename or state ID you have to open the "Properties" view (Fig.18: Change statename in the properties view). You will get it by "Window"->"Show View" -> "Other..." -> "General" -> "Properties" (Fig.17: Open the properties view).
Fig.19: Change Event
Fig.20: Add Action
To change a transitions event or action you have to select the transition and open its context menu (Fig.19: Change Event, Fig.20: Add Action). You can connect a transition to another state by drag one end of it and drop it to another state. All these changes are connected with an undo/redo controller.
When you save your statemachine it will be saved as an xml file which you either have created with your new statemachine or have opened before.
 1.7.2
1.7.2

